Constructing a Matrix Keypad

Scanning a Matrix Keypad
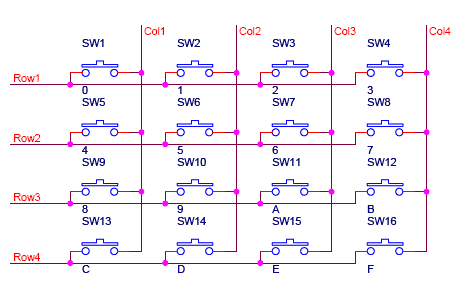
There are many methods depending on how you connect your keypad with your controller, but the basic logic is same. We make the coloums as i/p and we drive the rows making them o/p, this whole procedure of reading the keyboard is called scanning.
In order to detect which key is pressed from the matrix, we make row lines low one by one and read the coloums. Lets say we first make Row1 low, then read the columns. If any of the key in row1 is pressed will make the corrosponding column as low i.e if second key is pressed in Row1, then column2 will give low. So we come to know that key 2 of Row1 is pressed. This is how scanning is done.
So to scan the keypad completely, we need to make rows low one by one and read the columns. If any of the button is pressed in a row, it will take the corrosponding column to a low state which tells us that a key is pressed in that row. If button 1 of a row is pressed then Column 1 will become low, if button 2 then column2 and so on...
Now lets move on to the programming part of keypad in our next section.
Keypad Connections with 8051 Microcontroller

Circuit shown above is for demonstration and does not include any reset and crystal circuit. For practical use you need to have a reset circuit and crystal.
C Program for 4x4 Keypad Matrix
#include <AT89X51.H> //Include file for 8051
#define keyport P2 //keypad connected to P2
#define col1 P2_0 //column 1
#define col2 P2_1 //column 2
#define col3 P2_2 //column 3
#define col4 P2_3 //column 4
#define TRUE 1 //some defines
#define FALSE 0
/*
+---------------------------------------+
| Prototype: void key_init(void); |
| Return Type: void |
| Arguments: None |
| Description: Initialize ports and |
| Keypad. |
+---------------------------------------+
*/
void key_init(){
keyport &=0x0F; //make Rows as o/p and cols are i/p
}
/*
+-----------------------------------------------+
| Prototype: unsigned char get_key(void); |
| Return Type: unsigned char |
| Arguments: None |
| Description: To read key from the keypad |
+-----------------------------------------------+
*/
unsigned char get_key(){
unsigned char i,k,key=0;
k=1;
for(i=0;i<4;i++){ //loop for 4 rows
keyport &=~(0x80>>i); //to make rows low 1 by 1
if(!col1){ //check if key1 is pressed
key = k+0; //set key number
while(!col1); //wait for release
return key; //return key number
}
if(!col2){ //check if key2 is pressed
key = k+1; //set key number
while(!col2); //wait for release
return key; //return key number
}
if(!col3){ //check if key3 is pressed
key = k+2; //set key number
while(!col3); //wait for release
return key; //return key number
}
if(!col4){ //check if key4 is pressed
key = k+3; //set key number
while(!col4); //wait for release
return key; //return key number
}
k+=4; //next row key number
keyport |= 0x80>>i; //make the row high again
}
return FALSE; //return false if no key pressed
}
Using these keypad routines is really simple.. here is a simple example that shows how to convert the key numbers to displayable ascii characters.
unsigned char translate(unsigned char keyval)
{
if(keyval<10)
return keyval+'0';
else if(keyval>=10 && keyval < 16)
return keyval - 10 + 'A';
else
return '?';
}
/* usage */
ascii_key = translate(get_key());
/*
* ascii_key will have the ascii equivalent of key pressed on the keypad
* i.e. 0, 1, 2, 3, 4,...., A, B, C, D, E, F
*/
However the above function is just an example of how to use get_key function, you can define any translate function as per your requirement.

 Subscribe us by email
No comments:
Post a Comment